That’s okay, I’ll try to investigate myself in the meantime  I’ll try it on my desktop with a fresh Arduino environment, there is a tiny possibility that I’ve edited some Arduino files on my laptop and have broken something.
2 Likes
Great, at the moment, i use EspLGE but as soon as all will be ok for you and that you’ll have writte how you done, i’ll test to programm Espboy from Arduino IDE too. I have to compare results. I like the EspLGE system but i have to test what i can do with it and i’ll have to test all this great hardware add-on.
1 Like
Hmmm it doesn’t work on another computer either, will be testing it further. BTW is there any way for me to upload some already compiled binary to test the HW is still ok?
You could probably do it from the command line by following the same commands that the Arduino IDE uses to upload. If you bring up the IDE preferences:
File > Preferences
and then set
Show verbose output during: ☑ upload
you will be able to see, in the output of an upload, the command the IDE uses to do it.
Here’s what I got when uploading ESPboy_OTA from an Ubuntu Linux system:
/home/sa/.arduino15/packages/esp8266/tools/python3/3.7.2-post1/python3 /home/sa/.arduino15/packages/esp8266/hardware/esp8266/2.7.4/tools/upload.py --chip esp8266 --port /dev/ttyUSB0 --baud 921600 --before default_reset --after hard_reset write_flash 0x0 /tmp/arduino_build_758895/ESPboy_OTA.ino.bin
There appears to be a pre-compiled binary for ESPboy_FirstTest here:
Edit: Following the above instructions worked for me, by cutting and pasting the command from the IDE upload output and replacing the path/filename with that of the ESPboy_FirstTest.ino.d1_mini.bin file from the GitHub repository.
1 Like
Thanks! Indeed that binary works: TFT, buttons, sound and LED. So there is some error in my Arduino setup.
1 Like
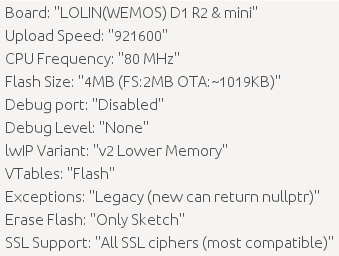
FWIW, I’ve always used the default values for the board settings when compiling sketches, including ESPboy_FirstTest and ESPboy_OTA. I don’t set 160 MHz, that @RomanS suggested to use for “heavy calculations games”.
Here’s a screenshot of my settings:
I tried both CPU speeds and didn’t change other things. Here is how I set up the Arduino:
- Downloaded Arduino (1.8.13).
- Installed WeMos D1 by following this, i.e. added this url to Additional Board URLs and installed esp8266 board from the board manager.
- Select the WeMos D1 R1 board under Tools.
- Installed the ESPBoy libraries from repo here, by downloading the repo as zip and extracting it to ~/Arduino/libraries.
Is that okay?
My setup matches yours except:
I use the latest versions of the required libraries, installed using the IDE library manager.
I change
#define MCP23017address 0
to
constexpr uint8_t MCP23017address = 0;
to get around the “overloaded begin()” error.
Here’s the last part of the build output for ESPboy_FirstTest
Using library Adafruit_MCP23017_Arduino_Library at version 1.2.0 in folder: /home/sa/Arduino_ESPboy/libraries/Adafruit_MCP23017_Arduino_Library
Using library Wire at version 1.0 in folder: /home/sa/.arduino15/packages/esp8266/hardware/esp8266/2.7.4/libraries/Wire
Using library Adafruit_MCP4725 at version 2.0.0 in folder: /home/sa/Arduino_ESPboy/libraries/Adafruit_MCP4725
Using library Adafruit_BusIO at version 1.7.1 in folder: /home/sa/Arduino_ESPboy/libraries/Adafruit_BusIO
Using library SPI at version 1.0 in folder: /home/sa/.arduino15/packages/esp8266/hardware/esp8266/2.7.4/libraries/SPI
Using library TFT_eSPI at version 2.3.56 in folder: /home/sa/Arduino_ESPboy/libraries/TFT_eSPI
Using library ESP8266WiFi at version 1.0 in folder: /home/sa/.arduino15/packages/esp8266/hardware/esp8266/2.7.4/libraries/ESP8266WiFi
/home/sa/.arduino15/packages/esp8266/tools/xtensa-lx106-elf-gcc/2.5.0-4-b40a506/bin/xtensa-lx106-elf-size -A /tmp/arduino_build_93559/ESPboy_FirstTest.ino.elf
Sketch uses 284884 bytes (27%) of program storage space. Maximum is 1044464 bytes.
Global variables use 28060 bytes (34%) of dynamic memory, leaving 53860 bytes for local variables. Maximum is 81920 bytes.
Just noticed this.
You should be selecting
LOLIN(WEMOS) D1 R2 & mini
3 Likes
Well… yes, you solved it Thank you. 
I though it wouldn’t work at all if I had selected the wrong board.
3 Likes
seemed OK.
never faced such problems
it’s better to update the board sdk in the Arduino board manager for WeMos D1 mini to the last version
the sound is uses standard Arduino tone(); function with pin D3
the LED is a standard WS2812B LED connected to D4 pin and could be controlled with Adafruit NeoPixel lib
keys are uses MCP23017 GPIO extender and could be read with standard Adafruit MCP23017 lib with address 0x20
LCD ChipSelect pin is also connected to MCP23017 pin8
and newest version of ESPboy LED has a ledlock transistor connected to MCP23017 pin9
so i think that it’s a good way to try simple init of the LED, MCP23017 and SOUND this way
#include <Adafruit_MCP23017.h> //to control buttons
#include <Adafruit_NeoPixel.h>
#include <TFT_eSPI.h>          //to draw at LCD TFT

#define PAD_LEFT        0x01
#define PAD_UP          0x02
#define PAD_DOWN        0x04
#define PAD_RIGHT       0x08
#define PAD_ACT         0x10
#define PAD_ESC         0x20
#define PAD_LFT         0x40
#define PAD_RGT         0x80
#define PAD_ANY         0xff

#define MCP23017address 0
#define LEDPIN          D4
#define SOUNDPIN        D3
#define LEDLOCK         9
#define CSTFTPIN        8  // CS MCP23017 PIN to TFT

Adafruit_MCP23017 mcp;
Adafruit_NeoPixel myled(1, LEDPIN, NEO_GRB + NEO_KHZ800);
TFT_eSPI tft;


uint8_t getKeys() { return (~mcp.readGPIOAB() & 255); }


void setup(){
//mcp23017 init for buttons, LED LOCK and TFT Chip Select pins
  mcp.begin(MCP23017address);
  delay(100);

  for (int i=0;i<8;i++){
     mcp.pinMode(i, INPUT);
     mcp.pullUp(i, HIGH);}

//sound init and test
  pinMode(SOUNDPIN, OUTPUT);
  tone(SOUNDPIN,200, 100);
  delay(100);
  tone(SOUNDPIN,100, 100);
  delay(100);
  noTone(SOUNDPIN);

//LCD TFT init
  mcp.pinMode(CSTFTPIN, OUTPUT);
  mcp.digitalWrite(CSTFTPIN, LOW);
  tft.begin();
  delay(100);
  tft.setRotation(0);
  tft.fillScreen(TFT_BLACK);
  tft.fillScreen(TFT_BLACK);

//LED pin LOCK OFF
  mcp.pinMode(LEDLOCK, OUTPUT);
  mcp.digitalWrite(LEDLOCK, HIGH);

//LED
 myled.begin();           // INITIALIZE NeoPixel strip object (REQUIRED)
};


void loop(){
 uint8_t keypressed;
 static uint8_t rnd = 0;

 keypressed=getKeys();

 if (keypressed){

    if (rnd==0) {
      tft.setTextColor(TFT_RED);
      myled.setPixelColor(0, myled.Color(50, 0, 0));
      }
    if (rnd==1) {
      tft.setTextColor(TFT_GREEN);
      myled.setPixelColor(0, myled.Color(0, 50, 0));
    }
    if (rnd==2) {
      tft.setTextColor(TFT_BLUE);
      myled.setPixelColor(0, myled.Color(0, 0, 50));
    }

    myled.show();
    tft.setCursor(0, 0);
    tft.setTextSize(2);

    tft.println("PRESSED:");
    if (keypressed&PAD_LEFT) tft.println("LEFT ");
    if (keypressed&PAD_RIGHT) tft.println("RIGHT");
    if (keypressed&PAD_UP) tft.println("UP   ");
    if (keypressed&PAD_DOWN) tft.println("DOWN ");
    if (keypressed&PAD_ACT) tft.println("ACT  ");
    if (keypressed&PAD_ESC) tft.println("ESC  ");
    if (keypressed&PAD_RGT) tft.println("RGT  ");
    if (keypressed&PAD_LFT) tft.println("LFT  ");

    tone(SOUNDPIN, keypressed*30,50);
   }

 else{
    rnd=random(0,3);
    noTone(SOUNDPIN);
    tft.setCursor(0, 0);
    tft.setTextSize(1);
    tft.print("Millis: ");
    tft.println(millis());
 }

 delay(200);
 myled.setPixelColor(0, myled.Color(0, 0, 0));
 myled.show();
 tft.fillScreen(TFT_BLACK);
}
this should work ok
with slow village internet my answer was too late and I didn’t notice the wrong board at all (
glad it worked out!
many thanks to MLXXXp for your attention and help)
3 Likes
After I have a complete thing working I will sum everything up in a post for other beginners, stressing to select the correct board etc.
2 Likes
Maybe a bit offtopic but I’ve discovered one unfortunate thing about the TFT library: it doesn’t allow you to change optimization level to anything else than -Os (optimization for size), it refuses to compile. For programs I want to run fast I use -O3 and it’s very effective, speeds up your program several times. But when I do this here (it’s done in a platform.txt file of the board), the TFT library doesn’t compile, it doesn’t compile even if I just delete the -Os flag. This can be bad for games, emulators and anything else that needs performance.
Just saying in case anyone doesn’t have anything to do and wanted to fix this somehow
Anyway, there’s something I will try. -O flags just turn on many specific optimizations, so I’ll try to figure out which exact optimization the library needs, then I’ll turn on only these and will try to add some speed optimizations that aren’t in conflict.
1 Like
Ouch well done. It’s alot upper my level but it’s a good thing to know. You can’t count on my to fix the lib but maybe someone will be able to do it or to do another lib with you optimizations and the things we use.
I have now messed up my flash memory somehow. I tried to use the eeprom library in my bigger project, the device showed some weird glitch screen and crashed, and now for some reason I can’t flash my project anymore. I can flash the small first test, but if I try to flash my bigger program, it doesn’t work, the previous program stays flashed, without buttons etc. working. Weird 
EDIT: The issue is in the display, it doesn’t update for some reason and displays the frame from previous program, but the new program is running underneath.
The bottleneck of ST7735 TFT LCD is the speed of the SPI bus.
So the fastest way to redraw an image on the screen is not to draw directly on the LCD, but to throw the screen from the screen buffer using the tft function tft.pushimage(…).
Yes, I found out it was slow. Then I started using the function pushColor, which made it completely smooth, until I’ve broken it with the EEPROM library somehow. It’s weird because the same code I was using and which was working isn’t working now. The display now only updates if I call fillscreen after my draw to the screen, but it causes flickering.
LCD is working when there is a GROUND (-3.3v) on the chip select pin.
this chipselect pin is connected to the to MCP23017 pin8 and which is should be set to LOW
but to be always sure you have GND on the CS, you can remove the pin from LCD’s CS to PCB and solder a small wire on the LCD from LCD_PIN_GND to LCD_PIN_CS
try to use pushimage()
EDIT i mean to make all drawings in the screen buffer and then do pushimage()